The main interface of Express Animate consists of several panels. Panels are organized in the main application window in an arrangement called a workspace. Three of the most commonly used panels are the Objects Panel, Canvas Panel, and the Composition Panel.
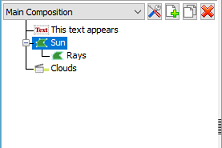
The Objects Panel allows you to change the active composition and displays the objects' hierarchy within the active composition. You can select and delete objects from the active composition or parent one object to another using drag and drop.
The Composition Panel is used for ordering objects in relation to each other and for timing adjustments.
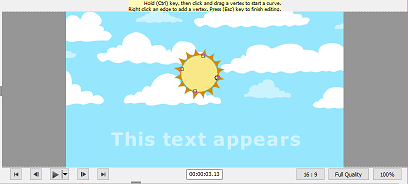
Everything that is visible in the composition at the current time marker are displayed in the Canvas Panel.

Objects Panel
Canvas Panel
Composition Panel

Adding Media Objects
Load video files (.avi, .mov, etc.), audio files (.aac, .mp3, etc.), or image files (.jpg, .png, etc.) using one of the following ways:
- Drag and drop one or more files from File Explorer or the desktop into the Canvas Tab.
- Select File -> Load Media Files...
- Click the Load Media tool bar button
Arranging objects on Canvas
When you place objects on the canvas their position on the screen is described with coordinates. When you select an object you can see its Position property inside the Composition Panel.
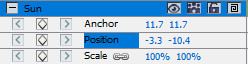
- The Anchor value represents the position of the anchor point in Object Coordinate Space, where the X and Y coordinates are relative to the Object's origin (0,0), which is fixed at the upper left corner of the Object.
- The Position value represents the position of the anchor point in the Composition space, where the X and Y coordinates are relative to the origin (0,0), which is fixed at the upper left corner of the Canvas.
- Select one or more objects, and then drag the selected objects with a mouse.
- When you move an object by dragging it on canvas, the position property gets automatically adjusted according to the objects' new position as you drag.
Move objects by directly modifying the Position property
- Select one or more objects.
- Find the Position property in the Composition Panel for the objects.
- Modify the X and Y Position properties.
Move objects with arrow keys
- Select one or more objects.
- To move selected objects one pixel left, right, up, or down, press an arrow key.
Arranging objects on the Timeline
The timeline control is located at the top of the Composition Panel and is used to set the current position of the active composition. The timeline works with timecodes (see SMPTR timecode). A frame is the minimum unit of measure on the timeline.

Objects may be selected either by, clicking the layer in the Canvas Panel, clicking its name or duration bar in the Composition Panel, or by clicking its name in the Objects Panel.
Selected objects are indicated with a blue highlight in the Composition Panel and is automatically scrolled to the top of the panel to ensure that it is visible in the panel.
The colored bars in the Composition Panel visually represent the objects' duration. The beginning of the duration of an object is its In point, and the end is its Out point. The duration is the span between the In and Out points, and the bar that extends from the In point to the Out point is the object duration bar.
To move an object in time, drag the object duration bar to the left or to the right. By default object duration bars snaps to significant points in time (such as bookmarks, or the start or end of the composition). You can turn Snapping off by pressing and holding the Shift keyboard key or by clicking on the Snap icon  located on the top of the Composition Panel.
Previewing the Composition
All items visible at the current time marker are displayed in the Canvas Panel.
You can adjust the Preview Quality from a drop down box at the bottom of the Canvas Panel. Hint: Decrease the preview quality to improve rendering performance.
Preview Playback Controls are located at the bottom of the Canvas Panel. Use Go to start, Go to end, Step back, and Step forward buttons to change the current timeline position. Click Play button to start the preview playback of the active composition.
There are 3 different playback modes which can be selected using a drop down menu next to the play button:
- Play every frame - Every frame of the composition is displayed according to the composition framerate. Audio is not available in this mode.
- Real-time playback - Composition is played back in real time. Frames are dropped if necessary to make sure video and audio are in sync during playback.
- Real-time playback of cached frames - Composition frames are cached starting from the current timeline position and until the preview cache is filled up completely. After the caching is done, real-time playback of the cached segment is performed in a loop.
Trimming objects' duration
To trim an object's duration is to modify its In or Out point so that the object has a different duration. By dragging either end of a layer duration bar you can trim the object's duration or extend it. Trimming object's duration does not alter video footage or original source files.
You can extend image, text and shape objects for any duration, extending their In and Out points out past their original times.
When you trim video or audio file object a pale bar represents the frames of the footage that you are excluding from the composition. You can choose which frames are played within a trimmed duration by dragging the slip-edit bar.
By default, new compositions have the duration of 30 seconds. Image, shape, and text objects have the default duration of 5 seconds, and the duration of video and audio objects is based on the duration of the original file.
To change the duration of a composition click Composition settings button next to the compositions list in the Objects Panel or click the Change composition duration button  located on the top of the Composition Panel.
Object properties in the Composition Panel
Each object has properties, many of which you can modify and animate. Every object has a Transform property group that includes Position and Opacity. By adding masks or effects to an object, you can create additional property groups for the object.
To expand or collapse a property group, click the collapse/expand button to the left of the object name or property group name.
Set a property valueTo change a property value click the highlighted value, enter a new value, and then press Enter. Or you can place the cursor over the highlighted value, press and hold the left mouse button, and drag to the left or right to increase or decrease the value.
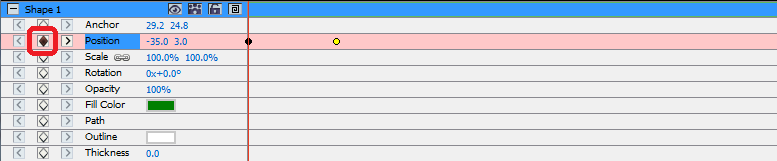
Animating a property
Any property that displays a little diamond icon can be animated - that is, changed over time. To start animating a property click the 'New key' diamond button. Then move the timeline cursor to a new position and change the property value.
Parent and child objects
Use the Objects Panel to assign objects as parents to other objects. This is useful when you want to animate several objects at the same time.
Select an object in the Objects tab and drag it on top of another object. The transform properties of the child object become relative to the parent object instead of to the composition. For example, if a parent object moves 5 pixels to the right of its starting position, then the child object also moves 5 pixels to the right of its position.
Parenting affects all transform properties except Opacity, Position, Scale and Rotation.
An object can have only one parent, but an object can be a parent to any number of objects in the same composition.
You can animate child objects independent of their parent objects, which won't be visible when rendering a composition.
Adding another composition as a child object
Other compositions may be included within the composition to help with the creation of larger, more complex compositions out of simpler ones.
To add another composition to the currently selected composition, select the new composition from the Composition button  on the Object tab. The child composition may be parented to any object within the current composition and acts just like any other child object within the composition, so can be scaled, rotated and moved just like any other object.
To edit the child composition, select the child composition from the composition pull-down at the top of the Objects Panel. The child composition can be modified separately of any composition that it may be a child of, all changes to the composition will be reflected in the any composition that it has been included in.
Creating shapes and masks
Creating shapes
To create a shape object click a shape (e.g. Rectangle, Ellipse, or Custom Shape) button on the tool bar. To select the type of the shape use the drop down menu to the right of the tool bar button.
- To draw a rectangle, click the rectangle tool bar button, move your mouse over the canvas, click and hold the left mouse button and drag diagonally.
- To draw an ellipse, click the ellipse tool bar button, move your mouse over the canvas, click and hold the left mouse button and drag diagonally.
- To draw a custom shape:
- With the Custom Shape tool bar button selected, click in the Canvas where you want to place the first vertex.
- Click where you want to place the next vertex to create a straight segment
- By continuing to click, you create a path made of straight line segments connected by corner points.
- To create a curved segment, click and drag the direction line handle to create the curve that you want.
- To finish editing press the Enter or Escape key
Creating masks
A mask is used for isolating an area of an object to make that part of the object transparent to the objects beneath it. You can create one or more masks for each object in a composition to cut out certain parts of an image, so the objects, positioned in the composition below the selected object, will show through. Masks can be animated over time, for example to follow a moving object in a video.
Editing masks is similar to editing shape objects.
To create a new mask select an object and click on the Mask icon on the main toolbar, or choose New Mask from the right-click menu in the Composition Panel. A Mask property group will appear in the objects' list of properties. With the Mask property selected, click and drag on yellow vertices on the canvas to change the shape of the mask. Hold Ctrl key when selecting a vertex to edit a curve for this vertex. Right-click on the Mask to add new vertices.
Applying Effects
Every object can have one or more effects applied to it.
To apply a visual effect to a selected object click the Effect toolbar button and select a Video effect from a drop down list.
To apply a sound effect right-click an audio object in the Composition Panel and select an effect from the Sound->New Effect menu. Alternatively you could apply an effect to selected object by selecting Object->Sound Effects from the main menu.
After you've applied an effect to an object, a new property group is created for that object in the Composition Panel. Some effect properties can be animated.
See: Full list of effects
Blending mode
It is possible to control the way an object blends with objects beneath it, or use an object as a stencil or silhouette.
The default blending mode is Normal. In this mode the result color is the color of the top object, the underlying color is ignored.
To change the oBject's blending mode right-click an object and select Blending Mode from a context menu.
Animation Curve Editor
Curve Editor control is used for precise control over the way an object property is animated. To activate the curve editor select a property of an object (e.g. Position, Scale, etc) in the composition panel and click Open the curve editor button  located on the top of the Composition Panel. Drag animation keys and their control points to modify the interpolation curve and control the way the property is animated. To change the interpolation type right-click an animation key and select Linear or Bezier Curve interpolation from the context menu.
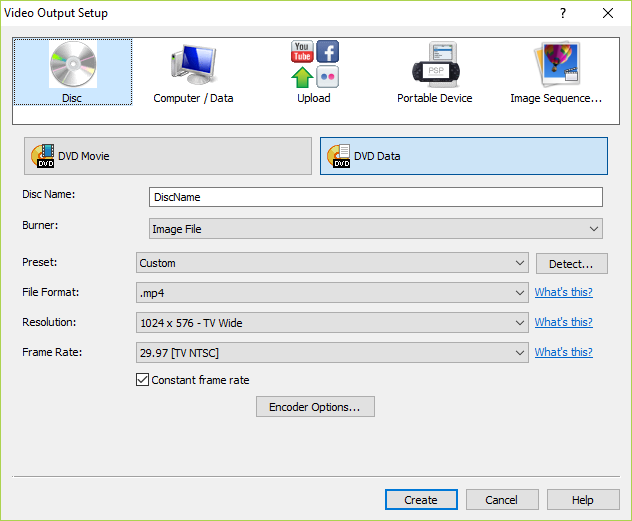
Rendering video
Once you have finished editing your project, save or upload a video to share it with other people.
- Click the Save Video button on the tool bar. The Video Output Setup dialog will appear.
- Select the destination device and format you want your project to be built for by clicking on the picture.
- You can adjust the settings for the format you have chosen if you want to. There are help pages for each destination type. Access them by clicking the Help button at the bottom of the Video Output Setup dialog.
- Click the Create button at the bottom of the Video Output Setup dialog.
- After the export process completes the video will be saved into the file you specified.
Exporting to HTML5
The final video may be published as a HTML5 web page that you can include on your own web site.
- Click the Save HTML5 button on the tool bar. The HTML5 Export Parameters dialog will appear.
- Select the output folder and resolution you want your project to be saved with.
- Click the Save HTML5 button at the bottom of the HTML5 Export Properties dialog.