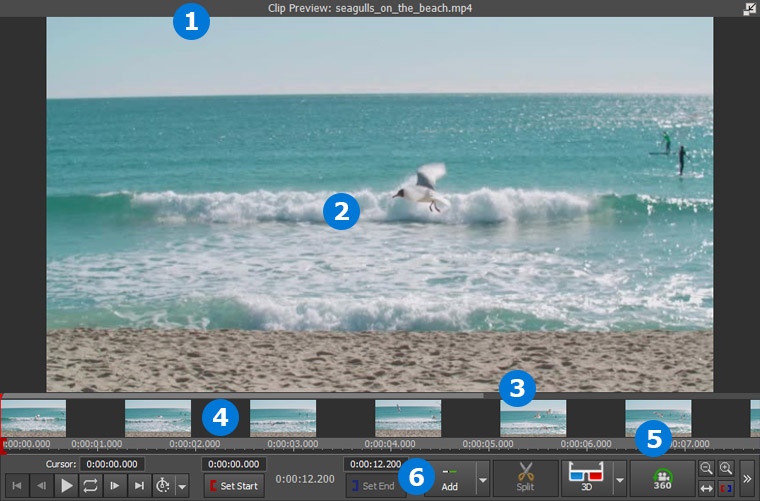
Shows the name of the selected clip / sequence. Clips can be renamed in the clip bins only, either from the right-click menu or from the Clip menu.
Shows the frame of the clip/sequence at the current playback position. Note that previews use a resolution which may be lower quality than the final video. Please save the sequence as a video to see the final quality.
Clip Preview resolution
For the Clip Preview, the selected clip will be displayed at its original aspect ratio and at a limited resolution. If you want better quality/resolution you should switch to Full Screen preview by using the Maximize button.
Sequence Preview resolution
The Sequence Preview's aspect ratio can be manually selected and the clips on the sequence will be letterboxed or pillarboxed to meet that aspect ratio. However, you will likely want to keep it on the default setting, Match Content which will smartly detect the aspect ratios of the clips on the sequence and change the sequence preview size to match. If, for example, there are 4:3 clips and 16:9 clips on the sequence, the Match Content algorithm will pick the ratio that has a greater combined length on the sequence.
The Match Monitor option will match sequence preview display aspect ratio with the aspect ratio of your monitor.
If the preview is played in a region that has not been cached yet, and frames cannot be rendered in real time, a message may be shown here in place of the preview.
Right-click on the preview for a context menu:
Show Previous and Next Frames
When checked, the previous, current, and next frames are shown side by side. Click on the previous or next frame to seek to that frame.
Use This Frame for Thumb Frame
If the selected clip is in a clip bin, this changes the frame shown in the clip bin in thumbnail view. If the selected clip is on a sequence, this changes the thumb frame shown when the sequence is in Storyboard mode.
Widescreen Aspect Ratio Fit
This changes the aspect ratio output of the clip.
Take Snapshot of Clip
Saves the frame from the current preview position to an image file, and adds it to the Images clip bin. When you click the dropdown menu, a prompt will appear asking you for the resolution at which to capture the snapshot. More information about the available resolution options can be found at http://www.nch.com.au/kb/10231.html.
Flip
Flip the video frame horizontally, vertically or both.
Note: This control is only available if the selected clip is in a clip bin.
Rotate
Rotates the video frame in 3D around the center in 90, 180 and 270 degrees
Note: This control is only available if the selected clip is in a clip bin.
Edit Video/Audio Effects...
Each video, audio, image, text, or blank clip can have one or more video effects applied to it. This item helps you to edit the effects applied to the clip.
When the timeline (see below) is zoomed in, the light gray area of the view region represents the region of the clip / sequence which is visible in the timeline.
Click in the view region to seek to that position in the clip or sequence. Dragging the current position will scroll the view region.
A thumbnail shows a frame relative to its location in the clip / sequence.
The vertical red line shows the current position in the clip / sequence. Left click in the timeline will seek to that position and also shows the menu included the following options:
Click the Zoom In / Out buttons (below) to change how much of the clip/sequence is visible on the timeline.
The Start and End Time of the clip / sequence are shown with red and blue triangles respectively.
See also: Trimming and Splitting Clips
As the preview cache is created, the timeline will fill blue to show progress.
Playback Controls
Play, pause, seek to the previous or next frame, or go the start or end of the clip / sequence. Loop: allow to play in a repeat mode without stopping. Playback Speed Change: change video/audio playback speed.
Title Editing (Title clip preview only)
Click on the Edit button to show title clip settings popup window. Click outside the popup window to dismiss the Edit window.
Text Content (Text clip preview only)
The text that is rendered to the frame when this clip is visible.
Note: Text clips on a sequence will use the same text as the corresponding clip in the bins.
Blank Clip Color (Blank clip preview only)
Click to select the blank clip's fill color.
Note: Blank clips on a sequence will use the same color as the corresponding clip in the bins.
Current Position
Displays the current position of the cursor. Click to seek to a specified position.
Start / End time (Video and audio clip preview only)
Used to trim clips / sequences. Click to set a new Start or End time.
See: Trimming and Splitting Clips
Duration (Title, image, text, and blank clip preview only)
Click to change the duration of the clip.
Animation Duration (Title clip preview only)
Click to change the animation duration of the clip.
View (Video Track clips in Clip Preview only)
Select the dropdown to switch what is displayed for track clips, or click the button to cycle through the options.
Place on Sequence (Clip preview only)
Adds a clip from a clip bin to the current sequence through the following options:
3D Options
When you click the dropdown menu, you will be presented with several stereoscopic layouts that images and video are commonly arranged by to preserve left and right eye information. Selecting one of these options will reload the clip preview to show one frame (left or right) from the source that you are trying to preview, allowing it to be viewed correctly.
360
Toggling this button On and Off, Enables and Disables the view's 360 degree preview mode.
While this mode is enabled, click and drag the mouse cursor wihin the preview window to change the view's rotation angle.
Split Clip(s) (All clips, Clip preview and Sequence preview)
Split a clip at the current position on the current sequence into multiple clips. Can operate on selected clip(s), all video clips, all audio clips, all tracks or specific audio/video track.
See: Trimming and Splitting Clips
Unlink / Relink (Sound and Video clips that were originally linked, Clip preview)
Unlinks or Re-links a pair of Audio and Video clips.
See: Linked and Grouped Clips
Aspect Ratio (Sequence previews only)
When you click the dropdown menu, you will be able to change ascpect ratio of all tracks.
Zoom In / Out
Changes how much of the clip/sequence is visible on the timeline. Zoom in for more accuracy when seeking, placing start / end time, etc. Zoom out to see more of the clip / sequence in the timeline.
Maximize
This button allows you to launch a full screen preview of the clip or sequence preview windows.