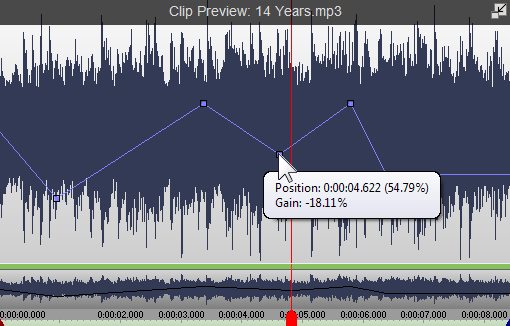
In addition to being able to change the volume levels of a whole track or a whole clip, it is also possible to vary the volume of a clip through its duration, by adding fade points. To start editing fade points, select an audio clip, either from a bin or on a sequence, to show its waveform image in the clip preview. Overlayed on the image is a blue line showing how much gain will be applied at each point in time. Negative gain, when the blue line is below the center, will make the audio quieter. Positive gain, when the blue line is above the center, will make the audio louder. Hover the mouse cursor over a fade point to show its position and gain value. Fade Points Presets Right-click on the audio clip preview, or on an audio clip within a track, and select one of the following fade effect options to automatically add fade points. Fade In Produce a transition from silence to the start of the sound in an input duration. - At the current position: start fade in from current position in an input duration.
- At the beginning of the audio clip: start fade in from the beginning of the clip in an input duration.
- Between the beginning and the current position: start fade in from the beginning of the clip to current position.
- To current from the beginning: start fade in to current position in an input duration.
Fade Out Produce a transition from the start of the sound to silence in an input duration. - At the current position: start fade out to current position in an input duration.
- At the end of the audio clip: start fade out to the end of the clip in an input duration.
- Between the current position and the end: start fade out from current position to the end.
- To the end from current: start fade out from current position in an input duration.
Cross Fade Fade out and fade in the two *bottom most* tracks in the sequence at the current position. This effect requires at least two audio tracks on the sequence at the current position. Fade Entire Clip An alias for the Amplify audio effect. Refer to Amplify audio effect. Adding Fade Points Click on the blue line, away from any existing fade points, to add another fade point. Moving Fade Points Click on any existing fade point and drag it to move it. Deleting Fade Points To delete a single fade point, right-click on it and select Remove this Fade Point. To delete all fade points, right-click anywhere in the audio clip preview and select Remove All Fade Points. |