To actually 'put pen to paper', you need to select a tool from the toolboxes. There are several types of tool. First there are the navigation tools, for selecting, panning, and zooming. Then there are the notation tools: a text tool, a bar line tool, dynamic markings tools, and most importantly the note and rest tools. Once you have selected a notation tool by clicking on it or by using its shortcut key, move your mouse over the paper to position the notation, and click to place it. Individual notation tools are described in more detail below. Finally there are tools that work on groups of notes: the tuplet and slur tools.  Tip: You can undo any change a tool makes by clicking on the Undo button in the Edit tab, or by pressing Ctrl+Z. Tip: You can undo any change a tool makes by clicking on the Undo button in the Edit tab, or by pressing Ctrl+Z.
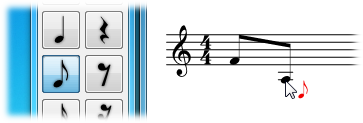
The Toolboxes The Toolboxes are the collections of tool buttons that appear to either side of the score. The toolbox on the left is the 'Note Toolbox', the grouped toolboxes on the right provide more tools including text, clef, key signature, time signature, dynamics and fretboard chords. Clicking on a tool will select it, deselecting any tool that was previously selected. In the grouped toolboxes, you can expand/collapse toolboxes and re-arrange the order of the toolboxes according to your needs. You can also use the drop-down menu to select a category of tools to go to the specific toolbox directly. Adding Notes and Rests Click on a note or rest in the Note Toolbox and then move your mouse over the paper and click to place it. The Note Menu (see below) will appear to allow you to make changes to the note, or you can continue placing more notes and rests until you deactivate the tool with a right-click or by selecting a different tool. Tip: Note tools can be selected quickly by pressing number keys 1 - 7. Rest tools can be selected quickly by pressing Shift + number keys 1 - 7. When adding eighth and sixteenth notes (quavers and semiquavers) in succession, they will automatically be beamed together. You can create a multimeasure(multiple bar) rest which indicates a long duration of silence for an instrument through Rest menu on the tab Notation or by pressing Shift + 0. You can use right-click menu to change the number above the multimeasure rest to set the number of measures that the rest lasts for.
The Note Menu The note menu appears to the left of a note (or a rest) when you click on it, or when you first place it. It will automatically disappear when you move your mouse away. The note menu allows you to make changes to the note, such as its duration, accidentals, accents, tie to the next note, and whether it is a rest or a note. If you have a note or rest tool activated when you change the duration of a note in the Note Menu, then the tool will be changed to one of that type and duration. Tip: The note menu can be navigated quickly using the keyboard: simply press the number next to the item you want to select, or press the Esc key to back out or close the menu. You can also cancel the current operation by mouse right-click. The Note Name Crescendo can show note/pitch name inside normal note head itself on the standard staff. It is possibly useful for music teachers and students. You can do it by right-clicking a note head for current note head or current selection. Chords To form a chord, add two or more notes of the same duration to the same position on the staff. The new note will merge with the existing note to from a chord when they are close enough. The Fretboard Toolbox on the right shows the tools for chord marks and contains the popular chord marks that can be added to the score. Click on a chord mark to activate it, then click on the score to add notation. To deactivate a tool, right-click or select the standard cursor tool. Chords have alignment helper lines and movement locking, similar to the dynamic markings. Crescendo provides some popular chords. If they cannot meet your requirement, you can define your chords and then reuse them. There are several display styles for chord marks: Show Name only, Show Diagram only and Show Name and Diagram. You can choose one of them according to your case by right-clicking on a chord mark or through the menu View/Chord Display. - The above menu items in right-click menu are used to change the current chord mark.
- The above menu items in the menu View/Guitar Chord are used to set it as default display style and apply it to all chord marks in the score.
- The above menu items in the menu View/Guitar Chord/Default are used to only change the default display style.
- The menu Set Style as Default in right-click menu is used to set the style of the current chord mark as the default style.
Voices If you want to write a score with multiple voices, please see the topic Voices.
Grace notes To create a grace note, place a note on a staff at the desired pitch and right-click on it and then select grace note. To modify the pitch of a grace note right-click it and untick grace note. Drag the note to the desired pitch and convert it back to a grace note. Tuplets Tuplets can be created by selecting the Tuplet tool from the Note Toolbox, and then clicking the first note and then the last note of the tuplet group. Crescendo creates triplets by default. You can customize the time ratio to turn it into any tuplet that you want. To customize a tuplet, right-click on the number, the bracket or a note in the tuplet. A popup menu will appear and allow you to change the tuplet's value and appearance. See Tuplet Dialog for more information. Tip: A tuplet will beam notes together despite the meter settings.
Tip: A regular note group (not a tuplet) can be created by setting the tuplet's time ratio to n:n, to force the notes to be beamed together.
Tip: Rests in the middle of a tuplet group can be beamed over.
Tip: A tuplet can be created over/inside another tuplet.
Ties To tie a note to any adjacent note, select the first note to bring up its note menu, then choose the tie item to toggle the tie on or off. A tie can also be toggled by right-clicking on the note head, and selecting Tied.
Slurs To slur a note to any following note, select the Slur tool from the Note Toolbox, then click the first note and then click the last note of the group. Tip: Slurs and ties are treated differently when playback, even though some times they looks the same.
Phrase marks To create a phrase select the Phrase mark tool from the notation tab under Relationships, the click the first note and then click the last note of the phrase.
Accidentals To set a note's accidental, select the note to bring up its note menu, then select the desired accidental. Accidentals can also be set by right-clicking on the note head, and selecting Accidental. An accidental symbol can be moved horizontally by clicking and dragging it. The symbol can be moved within the range of the measure, to avoid the interference with notes and other accidental symbols.
Dotted Notes To set a note's dotted state, select the note to bring up its note menu, then select one, two or three dots.
Accents To set a note's accent (accent (marcato), strong accent (martellato), staccato, staccatissimo, or tenuto), click on the note to bring up the note menu and choose the accent you want from the accents section.
Ornaments To add a Ornament mark to a note (Trill, Mordant, Turn), click on the note to bring up the note menu and choose the ornament you want from the ornament section.
Clefs To change clef, right-click on the existing clef, hover over Clef and select the desired clef from the submenu.
Time Signatures Right-click on the time signature. To set a time signature for a measure that has no time signature, right click on any staff area of the measure, hover over Time Signature and select a time signature from the submenu.
Key Signatures Right click on the key signature. To set the key signature on a measure that has no key signature, right click on any staff area of the measure, hover over Key Signature and select a key signature from the sub-menu.
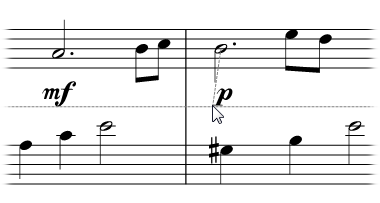
Dynamics The Dynamics Toolbox shows the tools for dynamic markings and contains the available dynamic markings that can be added to the score. Click on a dynamic button to activate it, then click on the score to add notation. To deactivate a tool, right-click or select the standard cursor tool. When a dynamics tool is activated, a horizontal dash line and a semi-vertical dash line will appear to help with the placement. The horizontal line helps to align the marking with other marking on the same line. The vertical line indicates the attachment position of the marking. When the vertical line points to the middle of a note head, the dynamic marking is attached to the note and will move with the note. By default, the object movement is vertically locked to a fixed position, like a magnet. The movement can be freed by holding down the Shift key.
Crescendo and Decrescendo (Hairpins) To create a crescendo marking (also known as hairpin mark), select the Crescendo or Decrescendo tool from the Dynamics Toolbox. Place the start point by clicking on the position you want, similar to placing dynamic markings and text, and then click to place the end point. Crescendo markings include two separated binding points, whereas dynamic markings and texts only have one. This means that the two end points of crescendo markings attach to different measures/notes and move with them accordingly.
Octave lines An octave mark/line (8va, 8vb, 15ma or 15mb) is a musical command indicating a note or series of notes will be played octaves higher/lower than written on the staff. They can reduce the number of ledger lines and make it easier to notate and to read notes off the staff. To create an octave line, select a tool from the Octave line Toolbox. Place the start point by clicking on the position you want, similar to placing dynamic markings and text, and then click to place the end point. Octave markings include two separated binding points, whereas dynamic markings and texts only have one. This means that the two end points of octave lines attach to different measures/notes and move with them accordingly.
Pedal lines Pedal marks appear in music for instruments with sustain pedals, such as the piano, vibraphone and chimes To create a pedal line, select a tool from the Pedal line Toolbox. Place the start point by clicking on the position you want, similar to placing dynamic markings and text, and then click to place the end point. Pedal markings include two separated binding points, whereas dynamic markings and texts only have one. This means that the two end points of pedal lines attach to different measures/notes and move with them accordingly. Besides standard pedal lines, there are various other lines in the Pedal line Toolbox to allow you to combine them to write the "notch" re-pedaling notation.
Glissando and Portamento Glissando (abbrev. gliss.) indicates rapidly glide from one pitch to another pitch. In some contexts, it is distinguished from the continuous portamento (abbrev. port.). To create a glissando, select a tool from the Glissando Toolbox. Select source pitch you want, and then click to another pitch in its next note as the target. Also, you can use right-click menu when you move mouse cursor on a pitch to add a glissando, change the glissando type or remove the existing glissando.
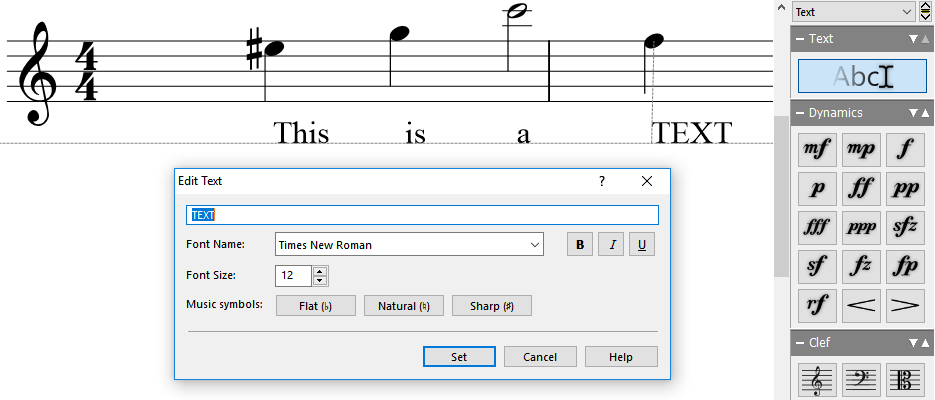
Text Text can be used to create tempo, expressions, lyrics and fingering numbers, etc. To add text anywhere on the score, select the text tool from the Text Toolbox, then click the score where you want the text to be added. This will open an Edit Text window. Type the text into the text field, set the size, the font and select formatting for the text if desired. Click the Set button to add the text to the score. To edit text, double click the text with the selection cursor, make the desired changes, and click Set to apply the changes. Using the selection cursor, you may also click and drag text around the score, or right-click the text to cut, copy, or paste text. Texts have alignment helper lines and movement locking, similar to the dynamic markings.
Lyrics Text tool is for generic purpose, but it is not productive for lyrics. You can use lyrics tool to create lyrics. Please see Lyrics for more information.
Ritardando and Accelerando The “Rit. and Accel.” toolbox is used to add dynamic tempos such as ritardando and accelerando. Ritardando is the gradual decrease in tempo and Accelerando is its opposite. To create a dynamic tempo, select a tool from the Rit. and Accel. toolbox and click a note or measure to place the symbol. Dynamic tempos can only be placed on the first staff of a bar. When the hovered mouse position is valid for placing a dynamic tempo, the symbol is activated. Horizontal and vertical lines will appear to help the placement.
Volta Brackets Volta brackets are used to indicate different endings or variations to repeated music. To add volta brackets to a measure right-click on a measure and select Add Volta. Alternatively the Volta tool can be used by selecting it from the Notation tab or by pressing the V key then click a measure at the start of the bracket and a measure at the end of a bracket. The variation of a measure can be changed by right-clicking on a bracket and selecting Edit Volta from the context menu. Editing the Score Formatting Notes  Auto Format is one of the most useful features in Crescendo. It automatically repositions all notes in the score or in the selected measures so they are equally spaced. Although each note can be moved manually, Auto Format saves hours of work arranging notes. Auto Format is one of the most useful features in Crescendo. It automatically repositions all notes in the score or in the selected measures so they are equally spaced. Although each note can be moved manually, Auto Format saves hours of work arranging notes.
Tip: While manually dragging notes around, you can hold down the Shift key to avoid accidentally changing the pitch of the note.
Deleting Objects Notation elements can be deleted by selecting them and clicking the delete key or using the Delete button on the Edit toolbar tab. Deleted items can be restored using the Undo button or by pressing Ctrl+Z. The Delete key may also be used on measures.
Moving Objects Notes and rests can be moved about by dragging them. They can be moved above and below the staff, which automatically creates the ledger lines. measures may be repositioned by dragging the bar lines.
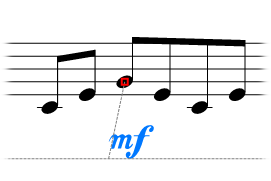
Moving Attachable Objects (Dynamics Marking and Text) Dynamic markings and text are attached to a measure (staff within a measure), or a note. When the object is selected, the attachment point will be visible as a small red box. Drag the object to move its position or drag the red box to move the attachment point so that the object can attach to another note/cell. By default, the attachment point cannot be moved between measures. By holding down the Ctrl key, attachment points can be freely moved to any measure. |